Trips| Kirstenbosch

Sunday, 20 January 2013  at 5:01 pm
Afternoon Lovelies!

I'm suffering from a case of "Boyfriend flu" and that would explain my minor leave of absence, also, the fact that I have to use my phone as a wifi hotspot to update my blog also explains the minor leave of absence.

We are finally on our third and last tourist destination! Kirstenbosch! Kirstenbosch is a botanical garden found nestled at the foot of Table MountainThere's really not much to say about Kirstenbosch solely because you'd have to visit it to experience the vibe and atmosphere of the garden. I know it sounds weird that a garden has a vibe and atmosphere, but with the many sculptures that are inspired by Zimbabwean sculptures, the concealed pathways that lovers usually walk together, the restaurants that culturally inspired face painting and not to mention the live bands and concerts that are held at Kirstenbosch, it's not hard to believe that it has a vibe and atmosphere. 


The entrance view, as you walk into Kirstenbosch.

Trips| Hout Bay

Monday, 14 January 2013  at 4:38 pm
Afternoon Lovelies!

The best place to eat great seafood would have to be Hout Bay! With the bustle of tourists, the smell of the ocean and an endless supply of sea gulls trying to catch a quick bite, Hout Bay would definitely be the best place to eat the freshest seafood. When I was younger, I would visit Hout Bay all the time with my mother, it was a way for her to get away from the stresses of life and an opportunity for me to increase my ever growing seashell collection. Hout Bay is an afrikaans word which translates to "Wood Bay", why they named it that, I have no idea but I'm not complaining.


View of the bay area, where all the boats dock.

Trips| Table Mountain

Sunday, 13 January 2013  at 9:55 am
Morning Lovelies!

It's such a nice day today, well morning. I absolutely love the feeling of nostalgia I get when the weather feels good and there's a cool breeze caressing my skin. As I mentioned in an earlier post I'll upload the pictures of the places I visited while I was in my hometown, I won't delve into too much detail of the history about it, since I hate history and I'm sure you do too. One thing I have to mention is, travelling on a cable car is by far an experience I'll never forget. I've never been on one before, in all my 19 years of being on this planet! Travelling upwards towards the mountain was relatively pleasant, but travelling down wasn't, because the platform on which you stand revolves it's hard to keep your balance so when I was travelling down I felt like I was going to fall out! Also, if you're prone to motion sickness, I suggest to skip travelling on a cable car, I don't get motion sickness easily, but with a revolving platform it's kinda hard not too. All in all it was an enjoyable experience and I'll definitely do it again!


Unknowingly to me, I forgot to put on sunscreen and my shoulders got burnt so badly! They're still burnt and extremely dry!

Haul| Beauty & Nail products

Wednesday, 9 January 2013  at 6:28 pm
Evening Lovelies!

I arrived last night at 22:00 from my home town and only got home at like 23:00. That will be the last time I take a evening flight, I hate evening flights because you're grumpy and irritable because of too little sleep, well at least I was *laughs* Haul posts will be uploaded less frequently now because I want to upload the pictures I took from my home town  I don't want to bore my lovelies with just haul posts since that does get tedious and boring after a while.


I really had high hopes for this lip balm because it claimed to have a repair core that contained dexpanthenol for dry, chapped lips and the outer coat is just to add a subtle pinky hue to your lips. Firstly, after two weeks like every other lip balm my lips adjust to the formula and no matter how much I apply my lips are flaky and dry. So, I've resigned myself to using Vaselines baby formula, I don't know if that's what it's called but I know it has a baby scent to it, which works really well for my extremely dry lips.


I don't recommend this product to anyone who is prone to extremely dry lips!


I think I might have kept these eye patches for too long because when I opened them they were extremely dry, it wouldn't even stick to my under eye area! So I can't comment on how well this product works.


I'm not fond of this mask at all because it too was dry but not as dry as the eye patches, it kept falling off but I do like the fresh cucumber scent it has, it makes my skin feel fresh. But other than that, that's all it offers.


You have no idea how long it took me to find these nail tapes! I bought them in silver, white, black and gold! I'm absolutely in love with them and they look really great when used in nail art.


Just for laughs!

Till the next post!
Bye Bye!

Haul| Clothes, Make-up & Accessories

Sunday, 6 January 2013  at 11:29 am
Morning Lovelies!

Right now I'm meant to be getting ready for another photoshoot at a beautiful botanical garden! I can't wait to upload the pictures once I've uploaded all I've wanted to upload from my previous hauls and other odds and ends. So please look out for that!


Photoshoot | Floral Pants

Friday, 4 January 2013  at 6:15 pm
Afternoon Lovelies!

My brother took these pictures a while back when I was on my Summer break and I didn't have the time to upload them then so I'm uploading them now! Enjoy!


What I'm wearing

Top::Edgars
Cardigan::Foschini
Floral pants::Foschini
Shoes::Trueworths
Nails::Essence Colour and go #129 "the boy next door" & #02 circus confetti

Till we meet again!
Bye Bye!

Pick-Ups| Goodies

Wednesday, 2 January 2013  at 11:04 am


I previously bought nail glue from the Oriental city near my house which was 8zar::$0.95, and it lasted MAX only a week on my nails...it was pretty weak glue, so I'm hoping that this one will last longer since I got it from a nail shop, but I have a feeling that the expectancy of all nail glue might be give or take a week or two.


I personally hate the fan brush, because I have no idea what it's actually used for. The designs that I have seen online haven't convinced me enough to use it in any of my designs, so for now I hate it.


You absolutely cannot do without this brush if you plan on using acrylic paint that's used on toy models to paint designs on your nails, this brush gives you more control and flexibility. The longer the nail art brush tip the harder it is to use it.


Although I'm interested in nail art, I had no idea what some of these brushes were actually used for (fan nail art brush, flat nail art brush..etc) Since I predominately use the thin detailed nail art brush, you can learn something new everyday! I know this post is super short but I felt like I needed to upload this just so that it can give everyone an idea of the type of tools that are used in nail art. What I really want is gel nail polish and a airbrush gun, but it's so expensive down here. Gel nail polish is about 100zar::$11.81 and that's excluding the UV light used to set the nail polish on your nail! An airbrush gun is probably ridiculously expensive...but I still want it *grins*

Till we meet again!

Bye bye!

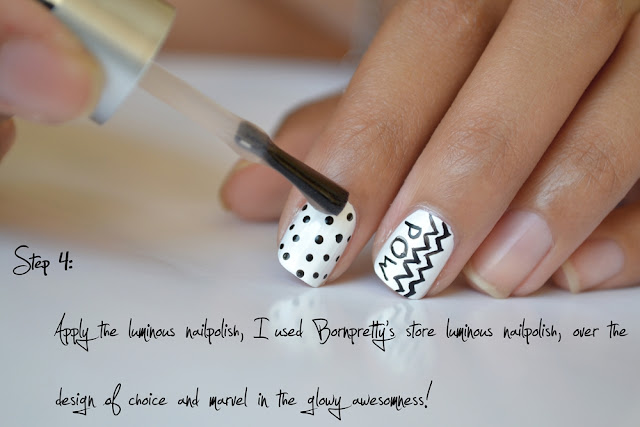
Tutorial| Luminous nailpolish

Tuesday, 1 January 2013  at 3:42 pm
Afternoon lovelies!!

I hope everyone has had a lovely Christmas spent with loved ones and an even better New Year! I didn't do much at all to be honest, while I was away on my mini hiatus, due to no bandwidth, without notice. Sorry for that. Since things have to get back on track with my blog, I'll be uploading pictures of some of the tourist attractions that my hometown has to offer. So look forward to that! Although I didn't get feedback on my previous post as to what I should include in my tutorial post (which I blame for the festive season) I'll upload all the tips and tricks that worked for my brother while he took the pictures of my glowy nails! I'll also include tips in the tutorial pictures as always which will hopefully offer some help.


Today we'll be doing a tutorial on Bornprettystore's "Luminous Polish"!


CAMERA SETTINGS:

  • Lens used-18-55 mm kit lens
  • Exposure compensation -5
  • Auto-ISO off
  • Aperture priority turned on
  • +1 shoe box, to prevent light from passing through so that the background can be black
And hopefully if you follow these settings you should turn out with images similar to THIS. If you happen to try out these settings I'd love to know how your images turn out and what results you obtain!


I don't want this to sound like a thank you speech at the Oscars *laughs* But I NEED to thank my lovelies and the new readers that have joined! Without the pagevew count continuously increasing and the comments I receive, this blog would have been another one of my many failed blog attempts *cringes* So, THANK YOU! For spurring me on and supporting me!


Till we meet again!

Bye Bye!